User Guide
DevBooks is a desktop app for managing contacts, optimized for use via a Command Line Interface (CLI) while still having the benefits of a Graphical User Interface (GUI). If you can type fast, DevBooks can get your contact management tasks done faster than traditional GUI apps.
- Quick start
-
Features
- Viewing help :
help - Adding a person:
add - Listing all persons :
list - Editing a person :
edit - Finding persons by name or tag:
find - Deleting a person :
delete - Pinning a person :
pin - Unpinning a person :
unpin - Clearing all entries :
clear - Exiting the program :
exit - Confirming commands :
y/n/yes/no - Switching Modes
- Launching external communication modes :
launch - Saving the data
- Editing the data file
- Accessing Command History
- Autocomplete
- Updating Tags for Multiple Contacts
- Deleting Tags for Multiple Contacts
- Exporting Contacts
- Viewing help :
- FAQ
- Known issues
- Command summary
- Navigation Summary
Quick start
-
Ensure you have Java
17or above installed in your Computer.
Mac users: Ensure you have the precise JDK version prescribed here. -
Download the latest
.jarfile from here. -
Copy the file to the folder you want to use as the home folder for DevBooks.
-
Open a command terminal,
cdinto the folder you put the jar file in, and use thejava -jar devbooks.jarcommand to run the application.
A GUI similar to the below should appear in a few seconds. Note how the app contains some sample data.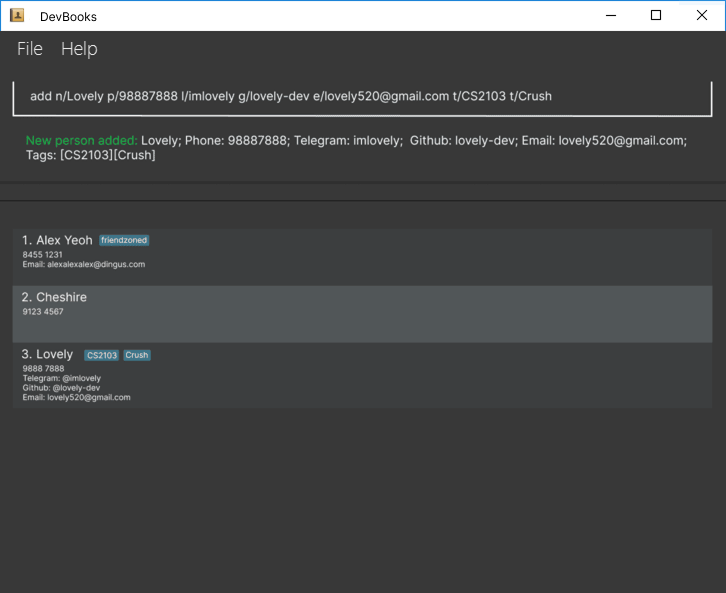
-
Type the command in the command box and press Enter to execute it. e.g. typing
helpand pressing Enter will display all the commands with its function.
Some example commands you can try:-
list: Lists all contacts. -
add n\Cheshire Doe p\98112321 e\cheshire@example.com l\cheshire_02 g\cheshire-dev: Adds a contact namedCheshire Doeto the Address Book. -
delete 3: Deletes the 3rd contact shown in the current list. -
clear: Deletes all contacts. -
exit: Exits the app.
-
-
Refer to the Features below for details of each command.
Features
 Notes about the command format:
-
Words in
UPPER_CASEare the parameters to be supplied by the user.
e.g. inadd n\NAME,NAMEis a parameter which can be used asadd n\John Doe. -
Items in square brackets are optional.
e.gn\NAME [t\TAG]can be used asn\John Doe t\friendor asn\John Doe. -
Items with
… after them can be used multiple times including zero times.
e.g.[t\TAG]…can be used ast\friend,t\friend t\familyetc. -
Parameters can be in any order.
e.g. if the command specifiesn\NAME p\PHONE_NUMBER,p\PHONE_NUMBER n\NAMEis also acceptable. -
Extraneous parameters for commands that do not take in parameters (such as
list,exitandclear) will be ignored.
e.g. if the command specifieslist 123, it will be interpreted aslist. -
If you are using a PDF version of this document, be careful when copying and pasting commands that span multiple lines as space characters surrounding line-breaks may be omitted when copied over to the application.
Viewing help : help
Shows help message in the GUI, explaining all commands.

Format: help
- Use command name to look up detailed usage

Format: help add
Adding a person: add
Adds a person to the address book.
Format: add n\NAME p\PHONE_NUMBER [e\EMAIL] [l\TELEGRAM] [g\GITHUB] [pm\PREFERRED_MODE] [t\TAG]…
-
NAMEandPHONE_NUMBERare mandatory fields. -
EMAIL,TELEGRAM,GITHUB,PREFERRED_MODEandTAGare optional fields. -
PREFERRED_MODEcan only be one of the following values (case-insensitive):telegramemailphone
-
NAMEaccepts letters, numbers, spaces, or forward slashes. -
PHONE_NUMBERshould only contain numbers, and it should be between 3 and 17 digits long. -
EMAIL, if provided, should be a valid email address format with maximum length of 254 characters. -
TELEGRAM, if provided, should only contain letters, numbers, or underscores, and it should be between 5 and 32 characters long. -
GITHUB, if provided, should only contain letters, numbers, or hyphens, and it should be between 1 and 39 characters long. -
TAG, if provided, should only contain letters and numbers, and it should be between 1 and 128 characters long.
 Tip:
A person can have any number of tags (including 0)
Tip:
A person can have any number of tags (including 0)
Examples:
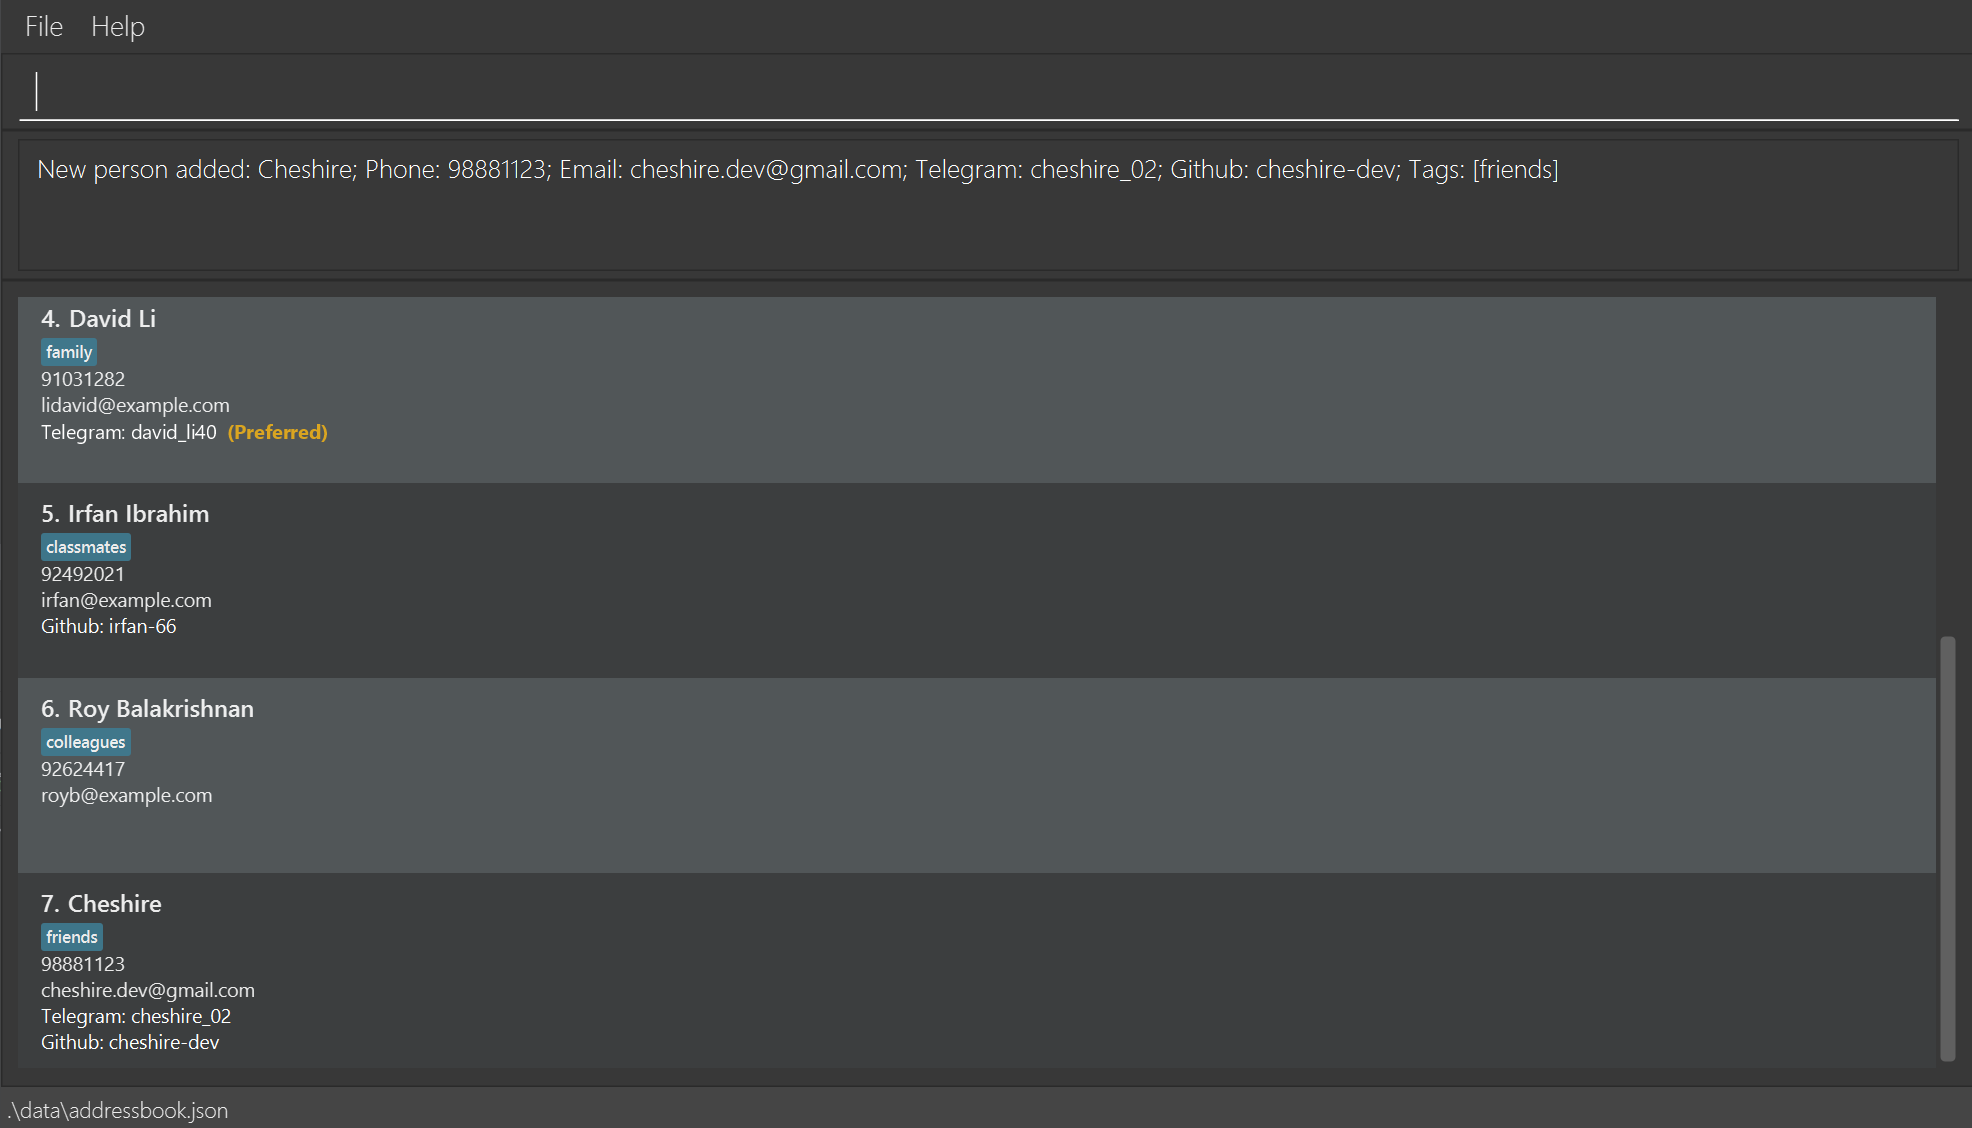
add n\Alice Chua p\90001231add n\John s/o Doe p\97449100add n\John Doe p\98765432 e\johnd@example.comadd n\Cheshire p\98112321 e\cheshire@example.com l\cheshire_02 g\cheshire-devadd n\Betsy Crowe p\99998888 t\friend e\betsycrowe@example.com t\criminal l\betsy001 g\betsy12 pm\telegram
Listing all persons : list
Shows a list of all persons in the address book.
Format: list [-a (alphabetical)] [-r (recent)]
- By default, lists all persons in the address book in the order they were added (first to last).
- Use the optional flag to change the listing order:
-
-alists all persons sorted in alphabetical order by name. -
-rlists all persons in the recent order they were added (last to first).
-
- User cannot combine both flags.
Examples:
-
listshows all persons in the order they were added. -
list -ashows all persons in alphabetical order by name. -
list -rshows all persons in the reverse order they were added. -
list -a -rerror message is displayed.
Editing a person : edit
Edits an existing person in the address book.
Format: edit INDEX [n\NAME] [p\PHONE] [e\EMAIL] [l\TELEGRAM] [g\GITHUB] [pm\PREFERRED_MODE] [t\TAG]… [r\TAG]…
- Edits the person at the specified
INDEX. The index refers to the index number shown in the displayed person list. The index must be a positive integer 1, 2, 3, … - At least one of the optional fields must be provided.
- To clear a field, specify the prefix but leave the value empty.
- Only
Email,Telegram,GitHub,Preferred Modefield can be cleared
- Only
- Existing values will be updated to the input values.
- When editing tags, you can add or remove tags.
- To add tags, use the prefix
t\followed by the tags to be added. - To remove tags, use the prefix
r\followed by the tags to be removed.- User will be informed if any of the tags to be removed do not exist on the person.
- To add tags, use the prefix
Examples:
-
edit 1 p\91234567 e\johndoe@example.com- Edits the phone number and email address of the 1st person to be
91234567andjohndoe@example.comrespectively.
- Edits the phone number and email address of the 1st person to be
-
edit 2 n\Betsy Crower t\CS2103 t\CS2100 r\CS1101S l\- Edits the name of the 2nd person to be
Betsy Crower, adds the tagCS2103&CS2100, removes the tagCS1101Sand clears the Telegram field.Edited Person: Betsy Crower; Phone: 91093122; Telegram: ; Github: BestyCrower; Tags: [CS2100][CS2103]
- Edits the name of the 2nd person to be
Finding persons by name or tag: find
Finds all contacts whose name or tag has any word starting with any of the given keywords.
Format: find n\KEYWORD [MORE_KEYWORDS] or find t\KEYWORD [MORE_KEYWORDS]
- Keywords must match the START of any word in the name or tag.
- e.g.
Hawill matchHans Zimmer(first name) andDavid Harris(surname), but notJohann.
- e.g.
- The search is case-insensitive.
- Only one prefix (
n\for names ort\for tags) can be used at a time. If both are provided, only the first prefix and its keywords are used. - Contacts matching at least one keyword will be displayed (i.e.
ORsearch). - The order of keywords does not matter.
Examples:
-
find n\John- Returns persons whose names contain any word starting with
John, such asjohnny TanandMary Johnson.
- Returns persons whose names contain any word starting with
-
find t\friend- Returns all contacts tagged with
friend.
- Returns all contacts tagged with
-
find n\alex t\friend- Searches by name only (
n\alex), ignores the second prefix.
- Searches by name only (
-
find t\friend n\alex- Searches by tag only (
t\friend), ignores the second prefix.
- Searches by tag only (
-
find n\a- Finds all persons with names start with “A” e.g.
Alex yeoh,amy tan
- Finds all persons with names start with “A” e.g.
-
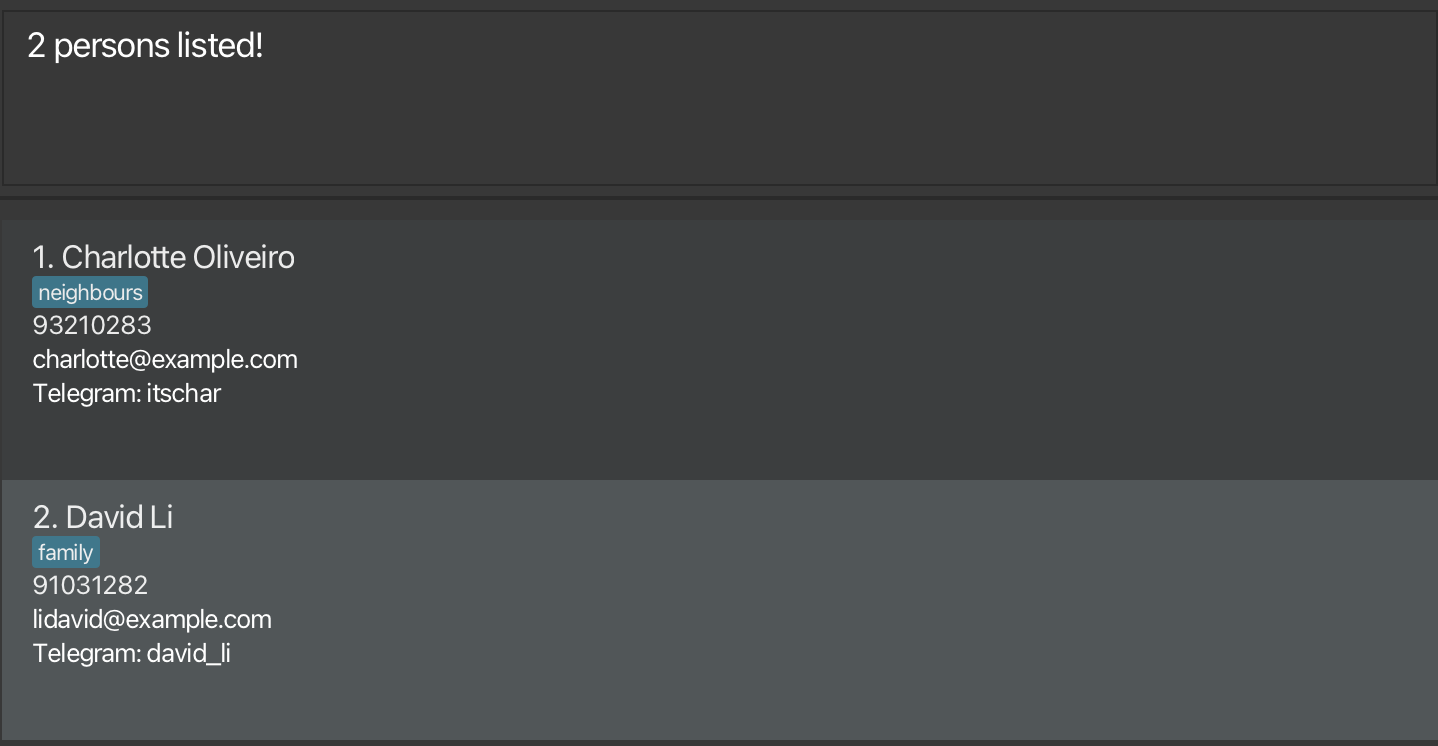
find n\charlotte david- Finds anyone whose name has words starting with
CharlotteorDavid. (e.g.Charlotte Oliveiro,David Li
- Finds anyone whose name has words starting with
Deleting a person : delete
Deletes the specified person from the address book. Command requires follow-up confirmation.
Format: delete INDEX
- Deletes the person at the specified
INDEX. - The index refers to the index number shown in the displayed person list.
- The index must be a positive integer 1, 2, 3, …
Examples:
-
listfollowed bydelete 2and aydeletes the 2nd person in the address book. -
-
listfollowed bydelete 2and anperforms no operation.
-
-
find n\Betsyfollowed bydelete 1and aydeletes the 1st person in the results of thefindcommand.
Pinning a person : pin
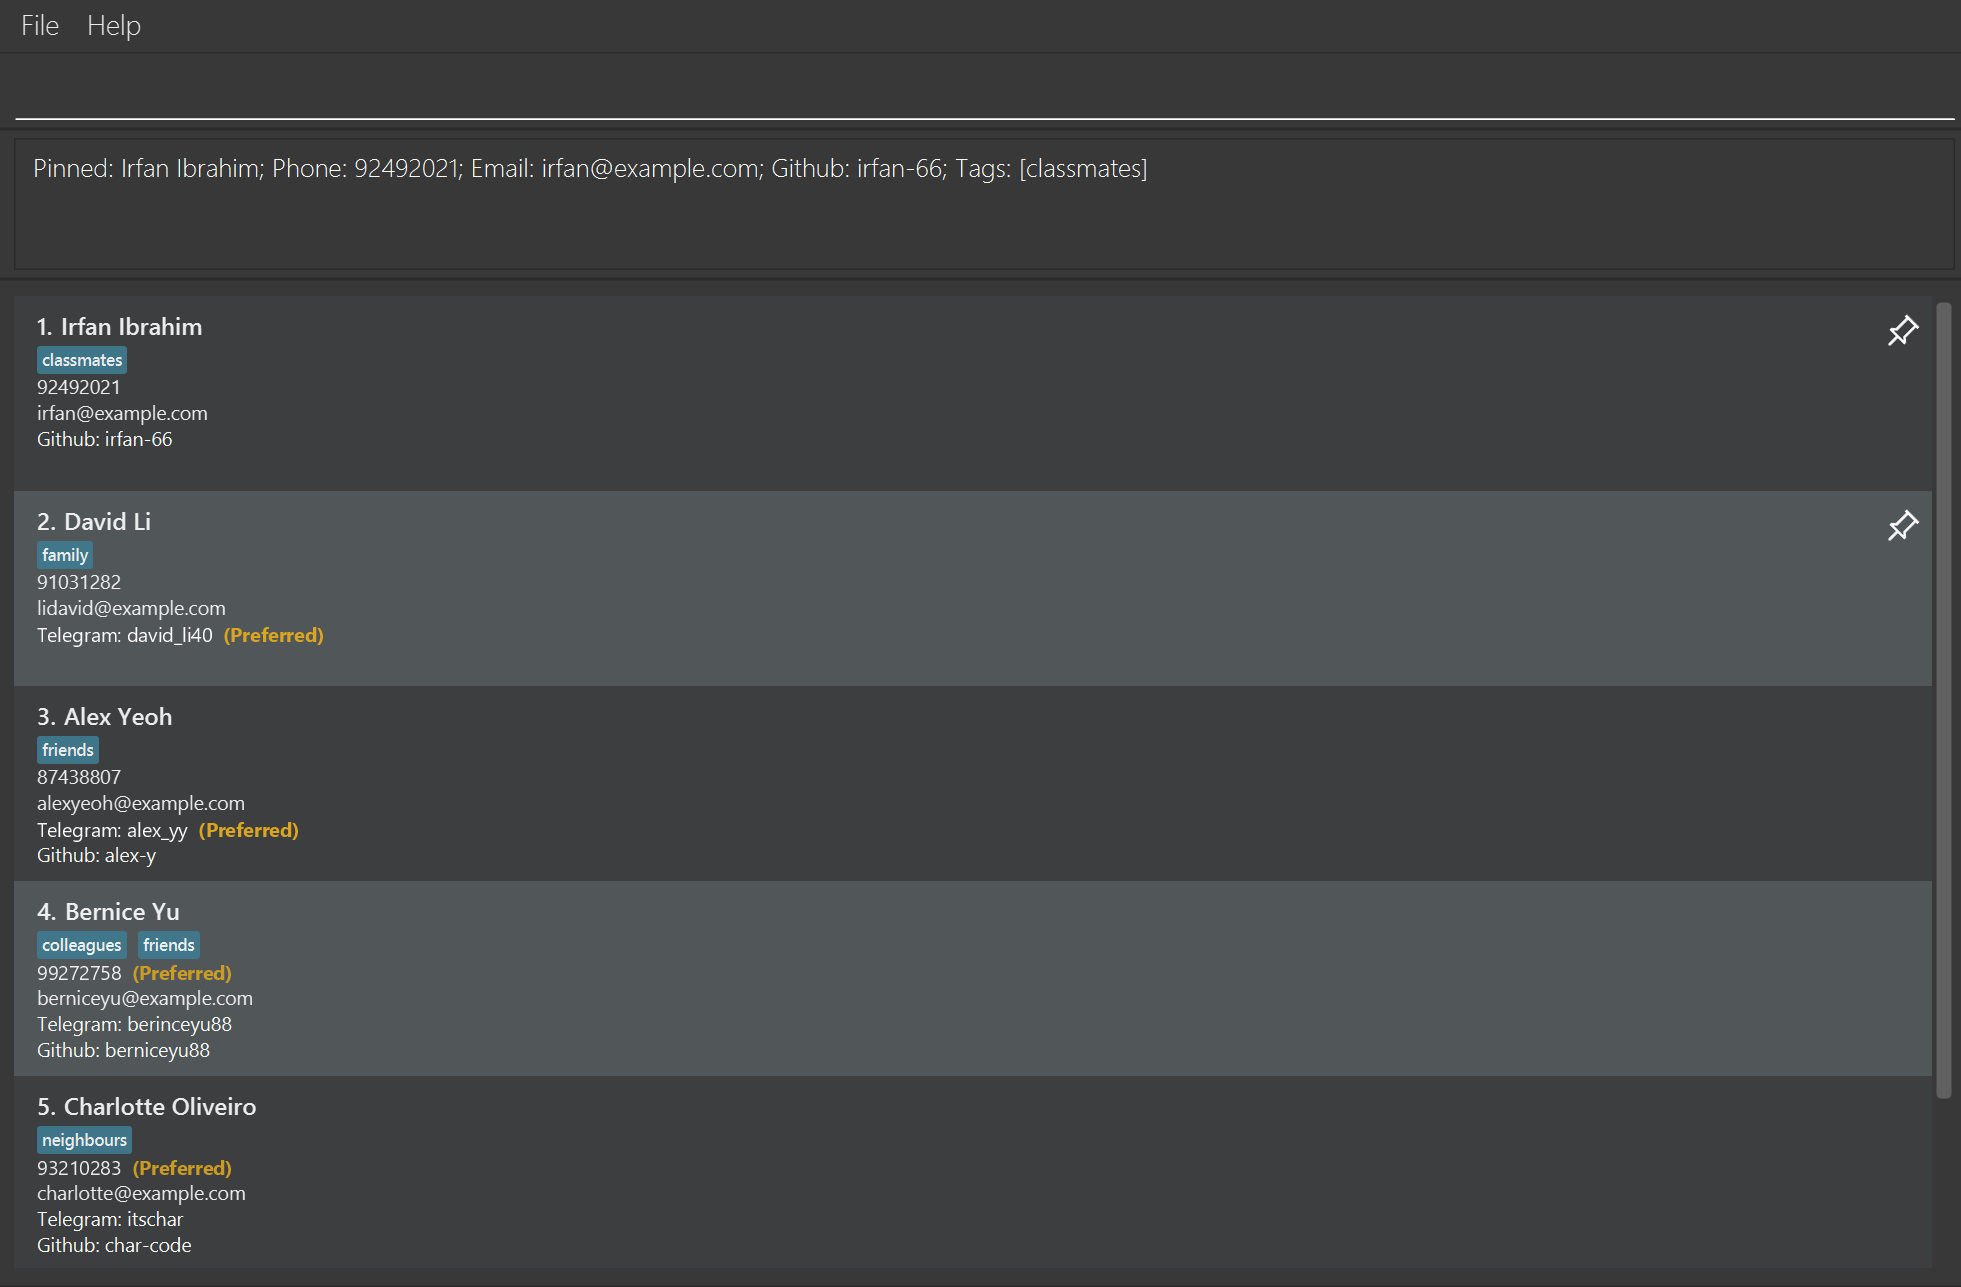
Pins the specified person to the top of the address book.
Format: pin INDEX
- Pins the person at the specified
INDEX. - The index refers to the index number shown in the displayed person list.
- The index must be a positive integer 1, 2, 3, …
Examples:
-
listfollowed bypin 4pins the 4th person in the address book to the top. -
find n\Betsyfollowed bypin 2pins the 2nd person in the results of thefindcommand.
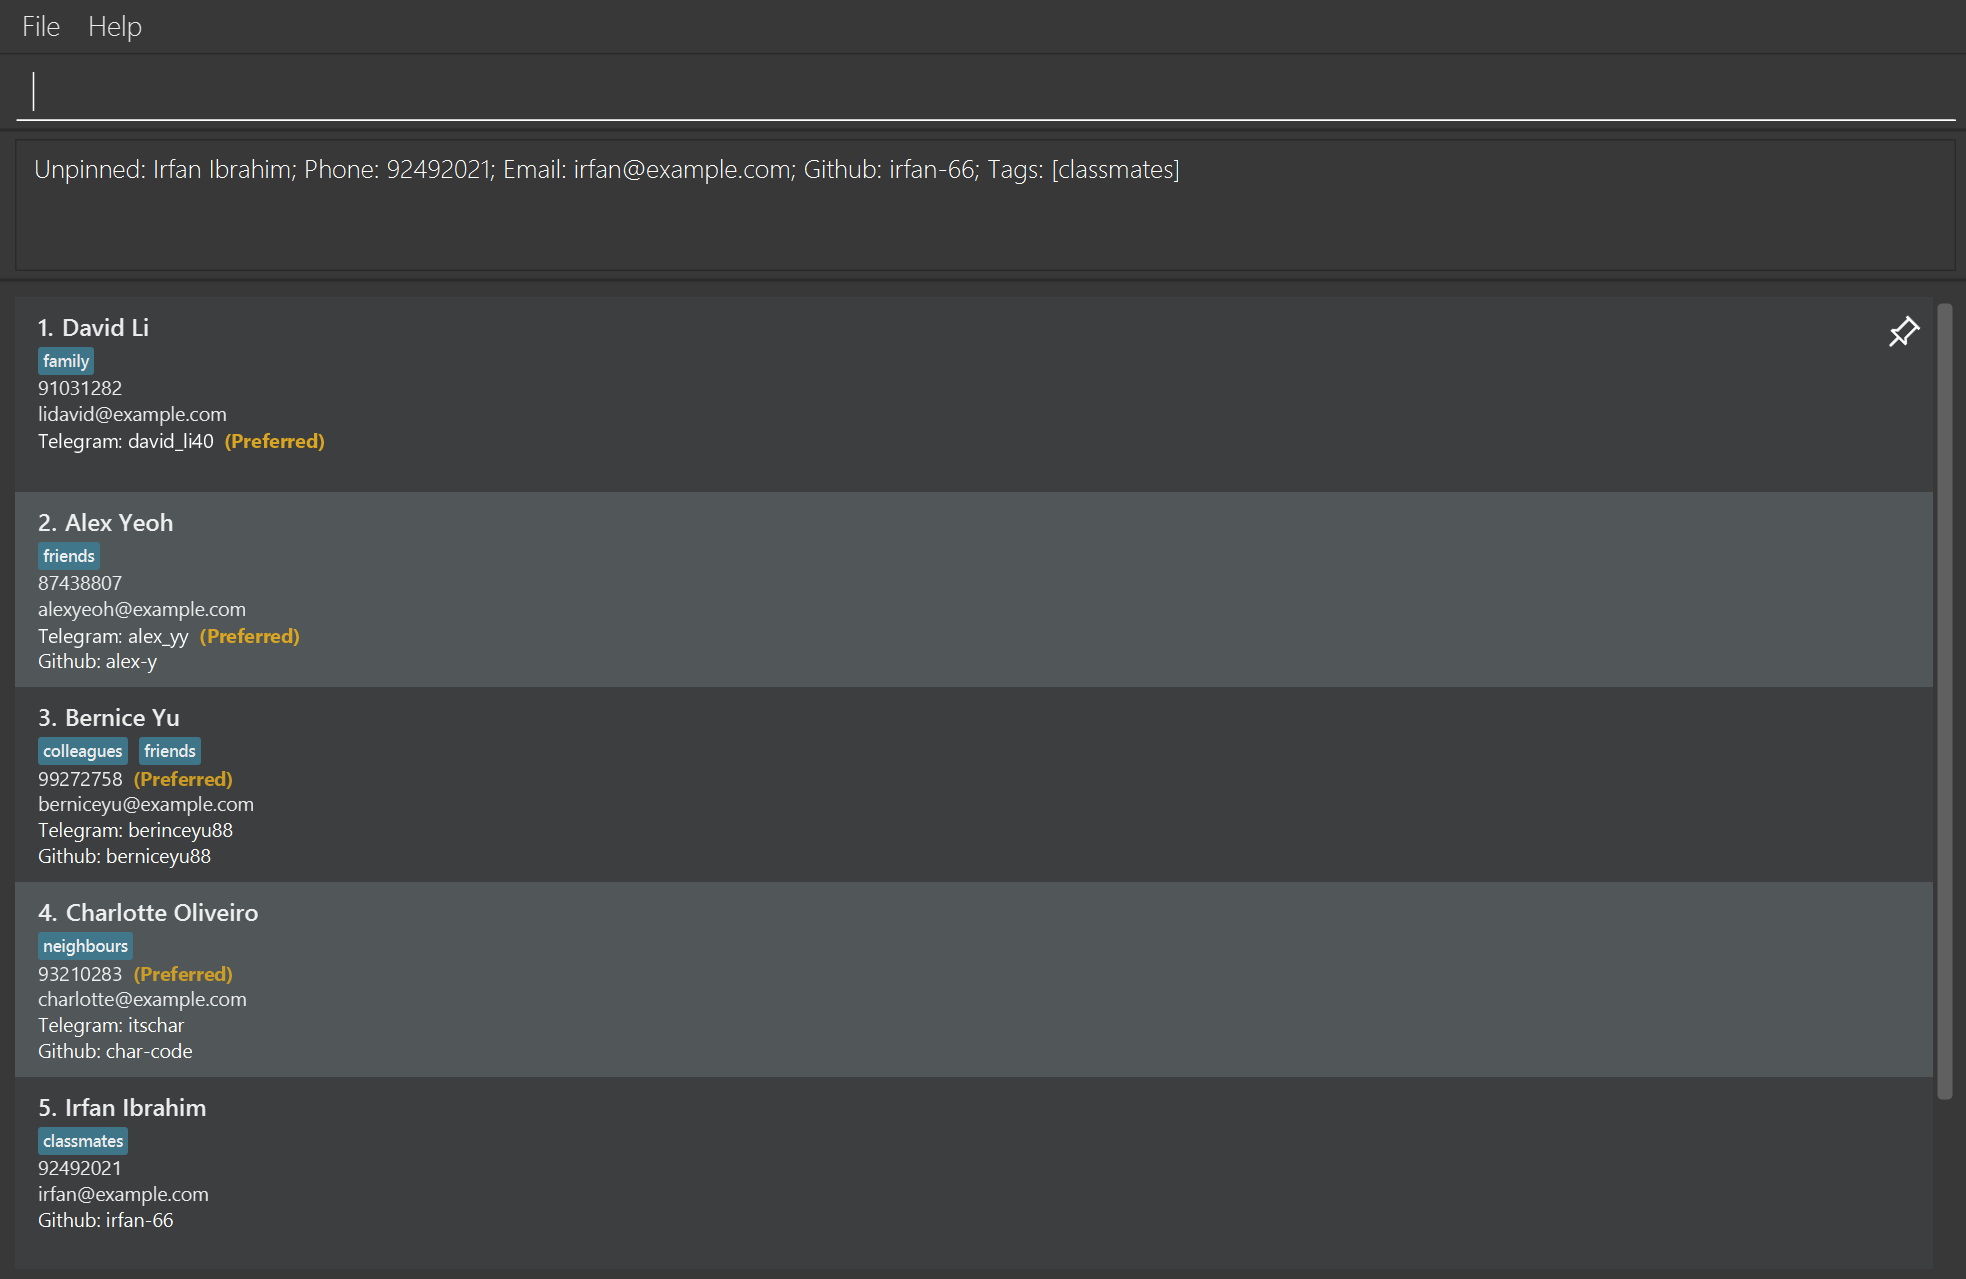
Unpinning a person : unpin
Unpins the specified person from the address book.
Format: unpin INDEX
- Unpins the person at the specified
INDEX. - The index refers to the index number shown in the displayed person list.
- The index must be a positive integer 1, 2, 3, …
Examples:
-
listfollowed byunpin 1unpins the 1st person and removes them from the pinned list at the top. -
find n\Betsyfollowed byunpin 2unpins the 2nd person in the results of thefindcommand.
Clearing all entries : clear
Clears all entries from the address book. Command requires a follow-up confirmation.
Format: clear
Exiting the program : exit
Exits the program.
Format: exit
Confirming commands : y/n/yes/no
The delete and clear commands require you to confirm the operation.
If a previous command required a confirmation, a valid confirmation must be supplied before other commands can be run.
Confirm Command Format: y or yes
Cancel Command Format: n or no
These above confirmation inputs are case insensitive
Switching Modes
Notes about switching modes:
-
Commands listed in the “Switching Modes” section are global - they don’t need to be inserted into the Command Box.
-
<Esc>refers to the escape key on the keyboard. -
Switching to scroll mode does not clear pending state - if you have a pending operation (e.g. deletion), you must confirm the operation upon switching back to insert mode.
Insert Mode: i
Insert mode is the mode the application starts in. It allows you to send commands in the Command Box.
Switch back to insert mode by pressing i.
Entering Scroll mode: <Esc>
Scroll mode allows you to navigate entries in the application without leaving the home row. Scroll mode disables input to the Command Box, but don’t worry about forgetting how to go back to insert mode - a helpful hint is shown every time you enter scroll mode.
Enter scroll mode by pressing <Esc>
Navigating down: j
Press j to select the entry below the current entry.
Navigating up: k
Press k to select the entry above the current entry.
Launching external communication modes : launch
Launches a browser to communicate with the specified person via the specified mode.
Scope: launching the browser with the correct link specified below.
Format: launch INDEX [-l (Telegram) | -g (GitHub)]
- The index refers to the index number shown in the displayed person list. The index must be a positive integer 1, 2, 3, …
- Use the flag to specify the communication mode:
-
-llaunches browser with the formatted linkhttps://t.me/HANDLE, whereby handle should be the specified contact’s Telegram handle,- Do note, to open the chat through web browser, the user is required to have Telegram application installed on their device. (i.e. send button does not allow redirecting Telegram web)
- However, the ability to check with is also beyond the scope of this feature.
- Additionally, checking existence of Telegram user is outside the scope of this feature and is handled by Telegram application.
- Do note, to open the chat through web browser, the user is required to have Telegram application installed on their device. (i.e. send button does not allow redirecting Telegram web)
-
-glaunches browser with the formatted linkhttps://github.com/USERNAME, whereby username should be the specified contact’s GitHub username,- Checking existence of GitHub user is outside the scope of this feature and is handled by GitHub.
-
- User must specify exactly one flag.
- If the person does not have the specified communication mode, an error message is shown.
- User’s interaction with the launched application is outside the scope of this feature.
- User can also launch external application through the GUI by left-clicking the Telegram or GitHub links of a person in the person card.
Examples:
-
launch 3 -llaunches browser with the formatted linkhttps://t.me/HANDLE, withHANDLEas the Telegram handle of the 3rd person’s in the displayed person list (given they have a Telegram Handle). -
launch 1 -glaunches browser with the formatted linkhttps://github.com/USERNAME, with theUSERNAMEas the GitHub username of the 1st person in the displayed person list (given they have a GitHub username).
Important Notes:
- The launch command has only been tested on the following operating systems.
- Windows
- MACOS
- LINUX (ARCH)
- LINUX (FEDORA)
- Your mileage with this feature might vary if your operating system is not one stated above.
- Kindly refer to Known Issues: 2 to see more about the limitations
Saving the data
There is no need to save manually as the AddressBook data are saved in the hard disk automatically ONLY after any command that changes the data.
- Commands that change the data include:
add,edit,delete,pin,unpin,tagandclear. - Commands that do not change the data include:
help,list,find,launch, andexit.
Editing the data file
AddressBook data are saved automatically as a JSON file [JAR file location]/data/addressbook.json. Advanced users are welcome to update data directly by editing that data file.
 Caution:
If your changes to the data file makes its format invalid, AddressBook will discard all data and start with an empty data file at the next run. Hence, it is recommended to take a backup of the file before editing it.
Caution:
If your changes to the data file makes its format invalid, AddressBook will discard all data and start with an empty data file at the next run. Hence, it is recommended to take a backup of the file before editing it.Furthermore, certain edits can cause the AddressBook to behave in unexpected ways (e.g., if a value entered is outside of the acceptable range). Therefore, edit the data file only if you are confident that you can update it correctly.
Accessing Command History
Access your previously entered commands by pressing the Up and Down arrow keys when the Command Box is focused.
Command history is saved and loaded every time.
Up to 15 of the latest valid commands are saved and preserved in the command history.
Previous Command: Up Arrow Key
Press the Up arrow key to cycle backwards through your command history.
Next Command: Down Arrow Key
Press the Down arrow key to cycle forwards through your command history.
Autocomplete
As you type commands in the Command Box, autocomplete suggestions may be shown. To accept the autocomplete text, press <Tab>.
Autocomplete suggestions are shown in-place and in grey.
Updating Tags for Multiple Contacts
Enables ability to rename/delete tags detail for all users that contains the specified tag within the currently displayed list.
Renaming Tags for Multiple Contacts
Format: tag -r t\TAG r\TAG
- Use
-rflag to signify a rename tag command -
t\TAGrefers to the value of the target tag to be renamed -
r\TAGrefers to the renamed value
Tip:
Target tag name are case-sensitive when renaming tags.
Example:
-
tag -r t\CS1101 r\CS2103- renames the existing tag
CS1101for all contacts that has it with the new tagCS2103 - Expected Output: (Assuming there are 2 people with this tag in the list)
Renamed tag [CS1101] to [CS2103] for 2 person(s). - Expected Output: (Assuming no contact has the
CS1101tag)No persons found with tag: [[CS1101]]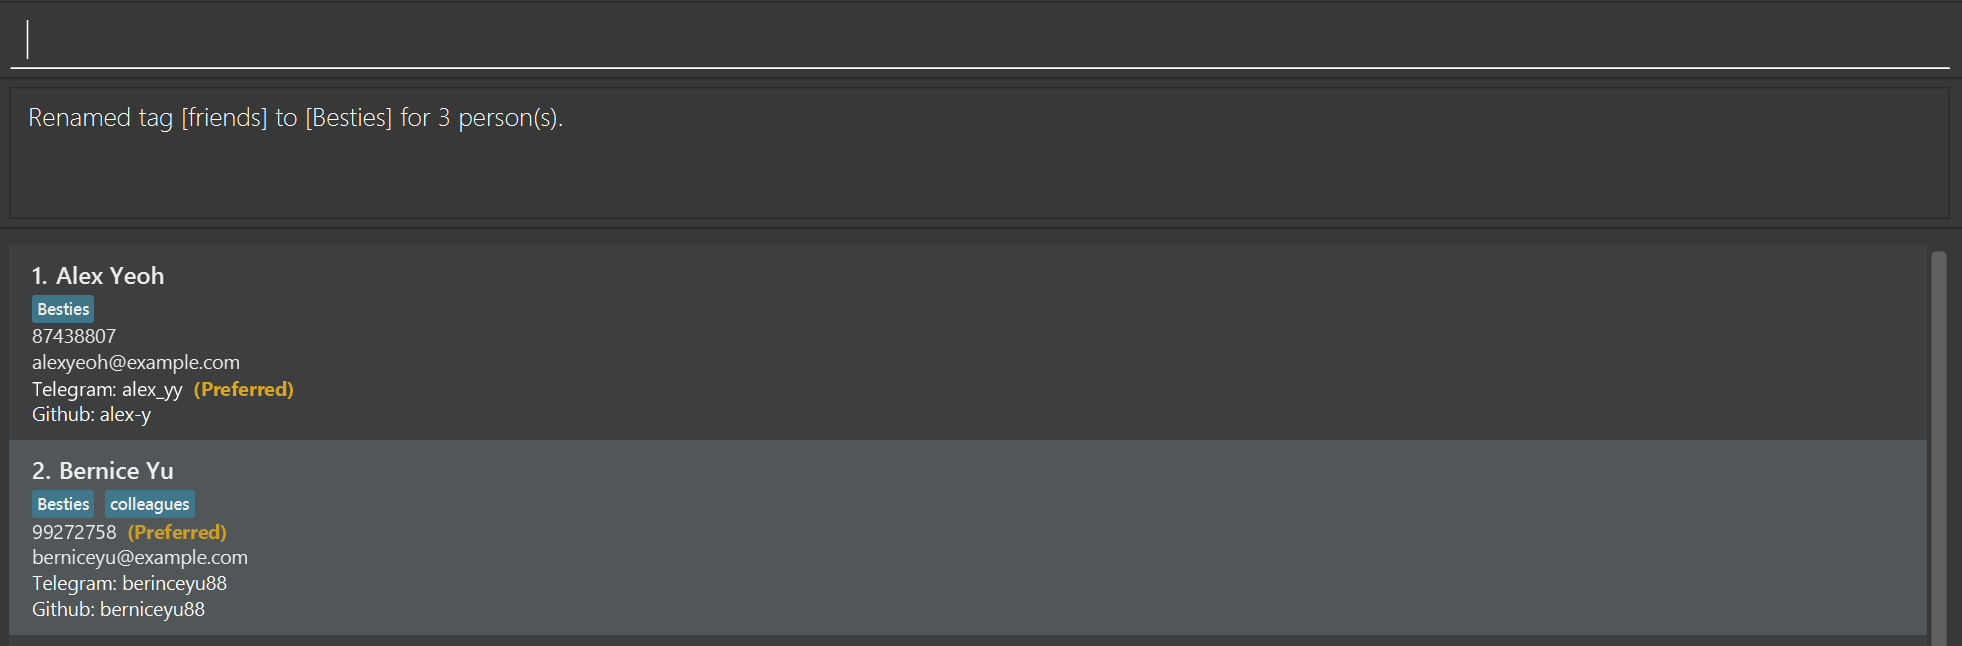
- renames the existing tag
Deleting Tags for Multiple Contacts
Format: tag -d t\TAG…
- Use
-dto signify delete tag command -
t\TAGrefers to the target tag to be deleted for all users
Tip:
Target tag name are case-sensitive when deleting tags.
Example:
-
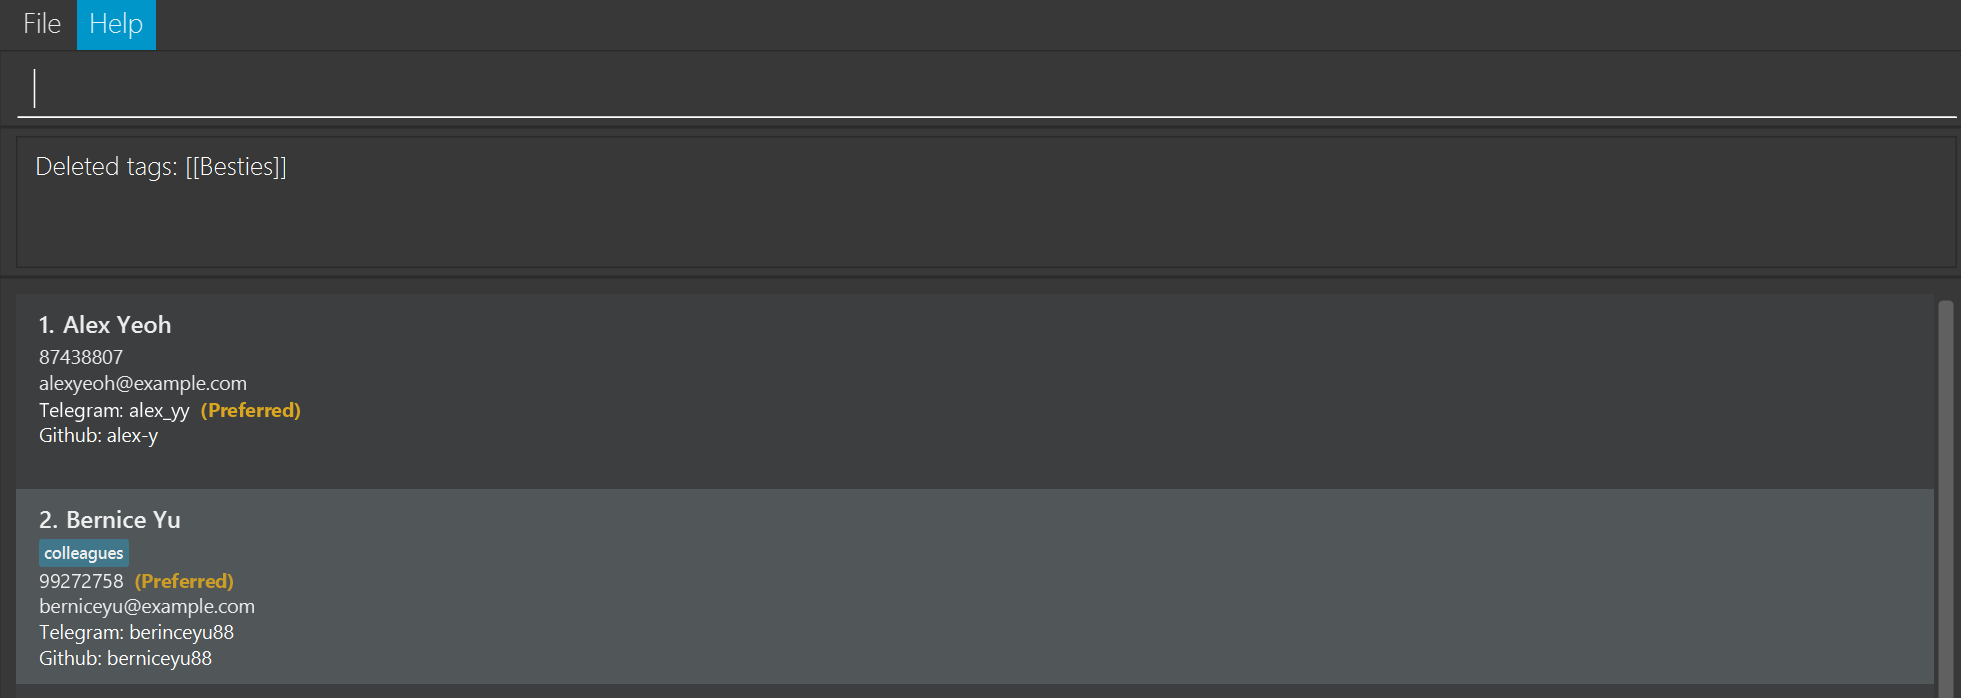
tag -d t\CS1101 t\CS2103- deletes
CS1101&CS2103tag for all contacts with the tag. - Expected Output: (Assuming there are 2 people with this tag in the list)
Deleted tags: [[CS1101], [CS2103]] - Expected Output: (Assuming no contact has both the
CS1101&CS2103tag)No persons found with tag: [[CS1101], [CS2103]] - Expected Output: (Assuming no contact has the
CS2103tag but there are contacts withCS1101tag)Deleted tags: [[CS1101]] Warning: No persons found with tag: [[CS2103]]. No operation performed on these tags.
- deletes
Exporting Contacts
Exports contacts into a csv file in the data folder.
Format: export NAME
-
NAMErefers to the name of the file -
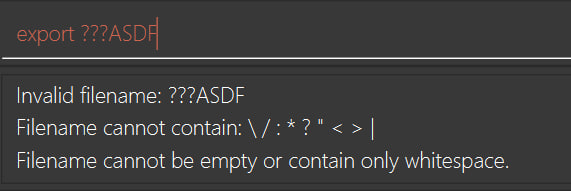
NAMEis optional. Default file name is contacts.csv - Naming convention and rules follow default filename rules, including illegal characters
- Common illegal characters include “<”, “>”, “:”, “?”…
- If
NAMEis already an existing filename in the data folder (export handles duplicate)- Appending
-1at the end of the filename - If the contacts.csv is already in the data folder, and user runs
export- contacts-1.csv will be created
- Appending
Example:
-
export- data will be exported to a file called contacts.csv in data folder
-
export phonebook- data will be exported to a file called phonebook.csv in data folder
-
export ???ASDF
 ——————————————————————————————————————–
FAQ
Q: How do I transfer my data to another Computer?
A: Install the app in the other computer and overwrite the empty data file it creates with the file that contains the data of your previous AddressBook home folder.
Known issues
-
When using multiple screens, if you move the application to a secondary screen, and later switch to using only the primary screen, the GUI will open off-screen. The remedy is to delete the
preferences.jsonfile created by the application before running the application again. -
If you are not using one of listed Operating System(OS), then
launchcommand may not work as expected. Whilst our implementation attempts to use system-specific command to launch the application first, its fallback mechanism uses the java.awt.Desktop api IF AVAILABLE. However, linux support with the java.awt libraries is already tenuous at best as it provides inconsistent behaviour between the different distros. Hence, kindly note that if your OS is not one stated in the list, the launch function may function inconsistently. - Unaccounted changes in the AddressBook if its addressbook.json file is edited whilst the application is running. This is mainly as a result of how we handle when the reading and saving of data is triggered. As a result we are unable to detect changes to the addressbook.json file during the run time of the application and any direct changes made to this file whilst the application is running will be OVERWRITTEN if saving of data is triggered. Hence, the user should NOT edit the addressbook.json file while the application is in use.
Command summary
| Action | Format, Examples |
|---|---|
| Add |
add n\NAME p\PHONE_NUMBER [e\EMAIL] [l\TELEGRAM] [g\GITHUB] [pm\PREFERRED_MODE] [t\TAG]… e.g., add n\James Ho p\22224444 e\jamesho@example.com l\james_ho23 g\james-dev10 pm\telegram t\friend t\colleague
|
| Clear | clear |
| Delete |
delete INDEXe.g., delete 3
|
| Edit |
edit INDEX [n\NAME] [p\PHONE_NUMBER] [e\EMAIL] [l\TELEGRAM] [g\GITHUB] [pm\PREFERRED_MODE] [t\TAG]… [r\TAG]…e.g., edit 1 p\91234567
|
| Find |
find n\KEYWORD [MORE_KEYWORDS] or find t\KEYWORD [MORE_KEYWORDS]e.g., find n\James Jake, find t\friend
|
| List |
list [-a (alphabetical)] [-r (recent)]e.g., list -a
|
| Help |
help COMMAND e.g., help add
|
| Launch |
launch INDEX [-l (Telegram)] [-g (GitHub)]e.g., launch 2 -l
|
| Tag | Rename: tag -r t\TAG r\TAG e.g., tag -r t\CS1101 r\CS2103 Delete: tag -d t\TAG… e.g., tag -d t\CS1101
|
| Pin |
pin INDEX e.g., pin 3
|
| Unpin |
unpin INDEX e.g., unpin 1
|
| Export |
export [NAME] e.g., export phonebook
|
Navigation Summary
| Mode | Key Bind |
|---|---|
| Insert | i |
| Scroll | Esc |
| Scroll Action | Key Bind |
|---|---|
| Scroll Up | k or arrow up key |
| Scroll Down | j or arrow down key |